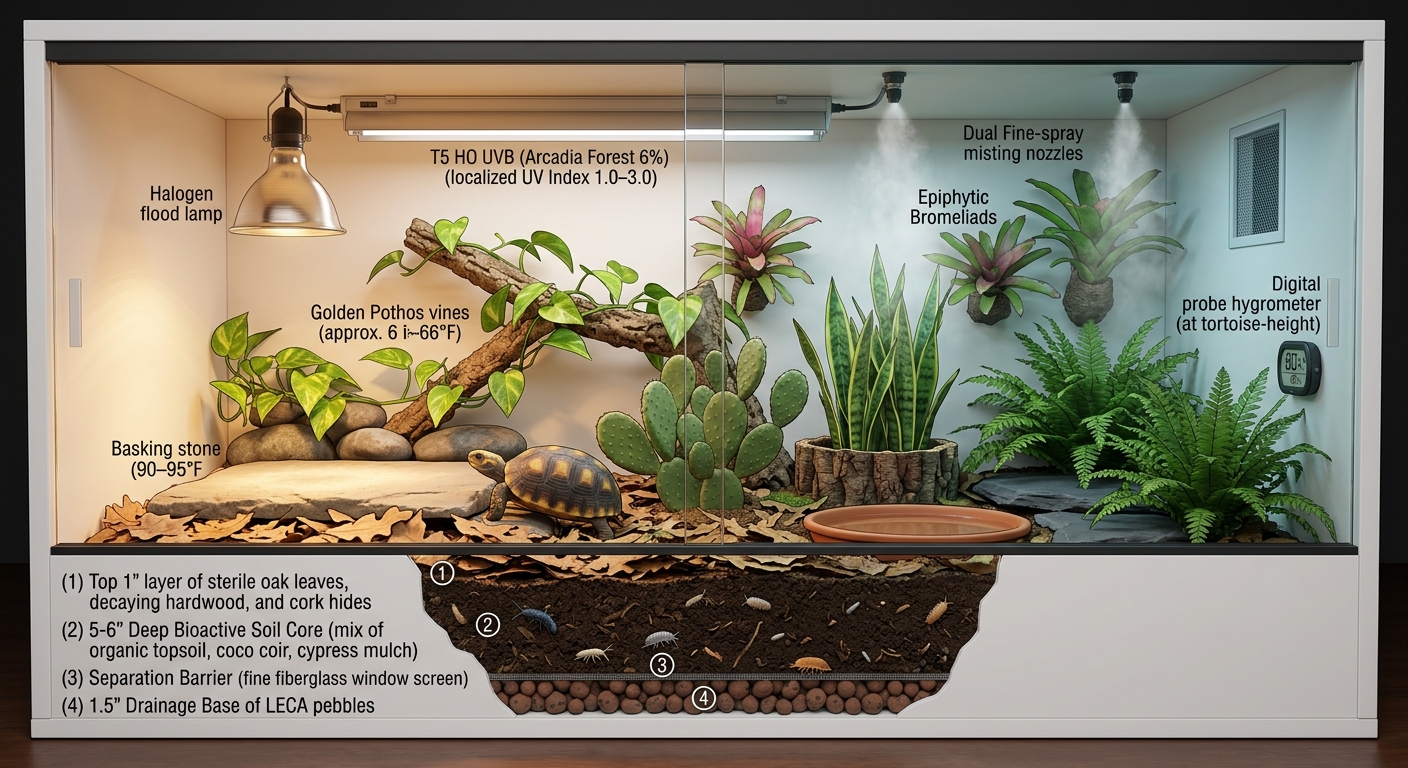
The schematic
A cutaway view of the finished enclosure — substrate layering, lighting, humidity hardware, planting plan, and probe placement.
Husbandry targets
Locked in before he moves in. Yellow-foots are forest-floor animals — deep moist substrate, dappled UVB, more fruit-tolerant and omnivorous than grassland tortoises.
- Basking surface
- 90–95°F
- Ambient (warm side)
- 80–85°F
- Cool side
- high 70s°F
- Night floor
- ≥ ~70°F (CHE kicks in)
- Humidity
- 80%+ (closed chamber)
- UVB
- 6% Forest, over basking side, UVI 1.0–3.0
Bioactive build manual
The working document we're building from on Day 1 — the lid cut template, where every piece of equipment goes, how the basking mountain stacks up, and the step-by-step build order.
The lid: what to cut
One expanded-PVC panel (~48 × 24") seals the top to hold humidity. Cut four openings; leave everything else solid. The whole right side is the warm/active zone, the left is the cool retreat.
| Opening | Size | Position | Screen |
|---|---|---|---|
| Basking | 10 × 10" | Warm side, ~4" in from right edge, ~2" from back | Leave screen in — lamp sits on top |
| CHE | 8 × 8" | Warm side, directly below basking, ~2" from front | Leave screen in |
| UVB slot | 4 × 20" | ~2" to the cool side of basking, centered front-to-back | Open mesh — cut screen out, or mount tube inside |
| Exhaust | 6 × 10" | Cool side, ~2" from left edge, centered front-to-back | Open mesh |
Cutting the PVC: score-and-snap or jigsaw the expanded PVC; leave ~2" of panel at each end of the UVB slot so the sheet stays one piece. Keep the panel only over the cool/covered area — expanded PVC sags at fairly low heat, so it never goes under the basking or CHE windows. Use glass or open mesh in those hot windows. Secure the panel by weight or clips (don't try to glue it).
Where the equipment goes
Front view. Hot and active on the right, cool retreat on the left — lamps on top, the climbable basking shelf below them, substrate at the bottom.
- Basking lamp over the warm window, aimed at the basking shelf.
- CHE just inboard, on its own thermostat — night warmth, no light.
- UVB tube under the lid spanning the warm half, so the shelf sits in heat and UV at once.
- Exhaust on the cool side pulls air in low through the front vents and keeps humidity high.
The basking mountain
In a 36"-tall tank a top lamp is too far from the floor, so the basking spot has to be raised. Build a climbable grade, not a tower.
- Grade, not a cliff. Build a low, terraced staircase or switchback ramp up to the shelf.
- Low, wide treads. Each step should be no taller than his shell height and wide enough to stand on.
- Anchor it solid. Silicone slate to cork, bury or wedge the bases, and avoid wobble.
- Flat shelf at the top. Big enough for his whole body and verified at 90–95°F with the IR gun.
Build order
Dry-fit everything first
Empty tank, no substrate. Decide warm side (lamps/basking) vs cool side, and rough-place the big hardscape and the mountain so you know it all fits before anything's wet or glued.
Cork background wall
Silicone cork bark to the back and side glass with aquarium-safe Kraken Bond silicone. Bead the edges. This is the most silicone you'll use — start it early so it has the longest cure.
Drainage layer
~1.5–2" of LECA across the bottom, then lay the fiberglass mesh over it as a barrier so substrate doesn't migrate down.
Substrate
Mix BioBedding + coco coir + cypress (Zoo Med) + soil (BNOSDM) + a little fir bark. Lay it 5–6" deep and lightly pack so it holds a burrow and a shape.
Build the basking mountain
Terrace the slate up to the shelf on a packed/cork mound, anchored solid, hide hollowed underneath. Put it on the warm side under where the basking lamp will sit.
Hides, wood & hardscape
Set the resin cave on the cool side (humid hide — pack with damp sphagnum), the warm cork hide center, the branch and driftwood, and the water dish on the cool side.
Plant it
Quarantined/rinsed plants only. Mount air plants and bromeliads on the cork wall with reef glue; plant ferns, hibiscus, spider plants, nasturtium, dandelion, hens & chicks. Let new growth come in before he grazes.
Cut & rig the lid
Cut PVC openings per the template. Mount UVB tube over (or inside) its slot; basking halogen on clamp + Reptizoo thermostat over the basking window; CHE on its own thermostat. Glass or mesh in the hot windows, PVC over the cool area, exhaust left open.
Water & fogger
Fill the water dish; route the fogger nozzle in (unit + cords stay outside); set the fogger to cycle.
Cure & verify
Let all silicone fully cure and air out (24–72 hrs, no vinegar smell). Confirm basking surface 90–95°F (IR gun), ambient 80–85°F, night floor ≥70°F, humidity 80%+ (Govee). Slide PVC/exhaust coverage until humidity holds.
Seed the cleanup crew
Tip the isopods + springtails into the leaf litter and damp corners. Spot-clean by hand while they establish.
Move-in
Only once silicone is cured and temps + humidity hold steady. Then daily care — and first weigh-in + shell measurement for the log.
Feeding & supplements
- Calcium without D3 — light dusting most feedings.
- Calcium with D3 — occasional only, never every feeding.
- Cuttlebone — leave in for free-choice calcium.
- Diet — varied greens, weeds, edible flowers, and some fruit. Rotate.
The journey
Reading first, building second
We spent weeks reading — Tortoise Trust care sheets, the yellow-foot keeper communities, peer-reviewed husbandry papers, and the long-running Carl May / Tortoise Group references. Every choice in the build was cross-checked against at least two independent sources.
A closed-chamber, not a tank
Yellow-foots need ground, humidity, and dappled cover — not a desert tank. We picked a 180-gal front-opening Reptizoo and planned the screen top to be mostly covered so we can hold 80%+ humidity without drowning the airflow.
A bioactive substrate that drains
Four layers: LECA drainage, fiberglass screen barrier, 5–6" of cypress/coco/bio-bedding/soil mix, and an oak-leaf-litter top. Powder-orange isopods and springtails handle the day-to-day cleanup so the floor stays alive.
Lighting and heat, measured — not guessed
T5 HO 6% UVB over the warm side for UVI 1.0–3.0. A 100W halogen on a PID dimming thermostat lands a 90–95°F basking surface (verified with an IR gun, not the air sensor). A second thermostat runs a CHE for the ~70°F night floor.
Plants that are safe to eat — and ones we won't plant
Edible: dandelion, hibiscus rosa-sinensis, nasturtium, sempervivum, spider plants, bromeliads, ferns. All quarantined and repotted before planting. Hard no on pothos, philodendron, creeping fig, cranberry hibiscus, and asparagus fern.
Care logged, not remembered
Every feeding, soak, calcium dust, weigh-in, and equipment swap goes into our own app, Forage. Photos snapped in the app land on this site automatically.
Build-day checklist
The order matters — drainage before substrate, cure before livestock, stable temps before move-in.
- Drainage → mesh → mixed substrate (5–6") → leaf litter on top
- Silicone the cork wall; cure 24–72 hrs with airflow until no vinegar smell before he's anywhere near it
- Mount UVB over warm side; set basking halogen on the Reptizoo thermostat to 90–95°F; set CHE thermostat to a ~70°F night floor
- Quarantine / rinse / repot all plants; let new growth come in before grazing
- Run the enclosure 1–2 days and confirm temps + 80%+ humidity hold before Shelldon moves in
- Seed isopods + springtails; spot-clean by hand until they establish
- First weigh-in + shell-length measurement → log in Forage
Build videos
Silent clips from the live build — tap play on any tile. Captions are auto-generated from what's on screen.
Shelldon walks the cork-walled floor for the first time, picking his way past ghostwood and fresh planting while the bioactive layer settles in.
A slow tour past the cool-side ferns and bromeliads. Substrate is deep enough for a real burrow and the cork wall is fully cured.
The lid fogger cycles through and the cool side fills with mist — exactly the rainforest floor humidity yellow-foots need to stay hydrated.
Build photo gallery
Every step of the build, in order. Captions are auto-generated from what's visible in each shot — swipe or use the arrows to step through.
All 18 build photos — start to finish.
Live build journal
Day-by-day entries — photos, what went well, what we'd do differently. We'll publish each step from inside the Forage app as we work through it.
- Stage 1 · BackgroundDay 1
Cork bark wall, siliconed and curing
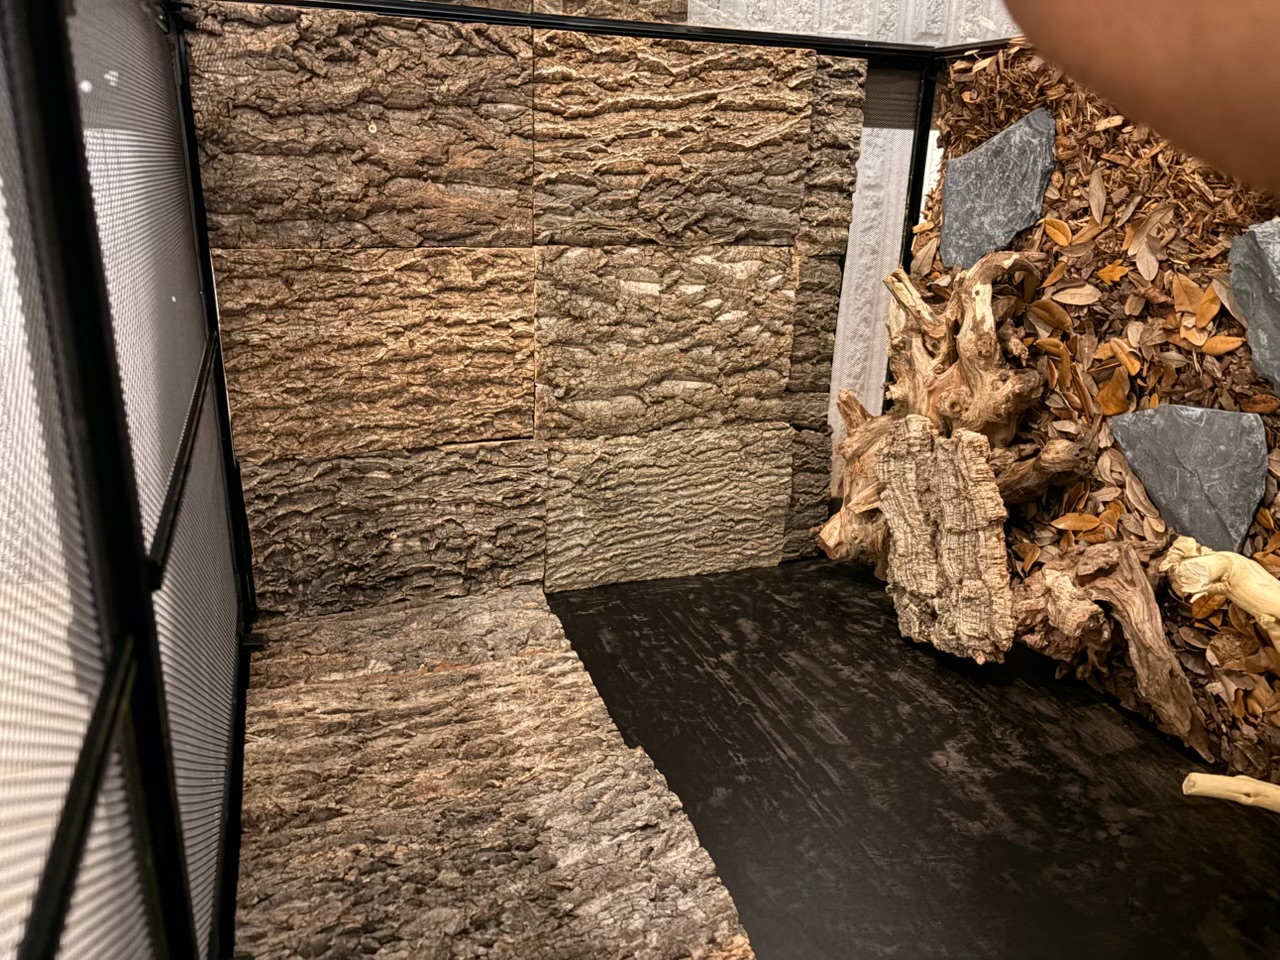
First real step: tiling the back and side glass with cork bark panels on aquarium-safe silicone. The dark painted strip at the front-left is the substrate line — everything below it disappears under 5–6" of bioactive mix. Started cork early so the silicone has the longest cure window before plants and animals go anywhere near it.
- Stage 2 · Hardscape dry-fitDay 1
Dry-fitting the hardscape before anything's wet
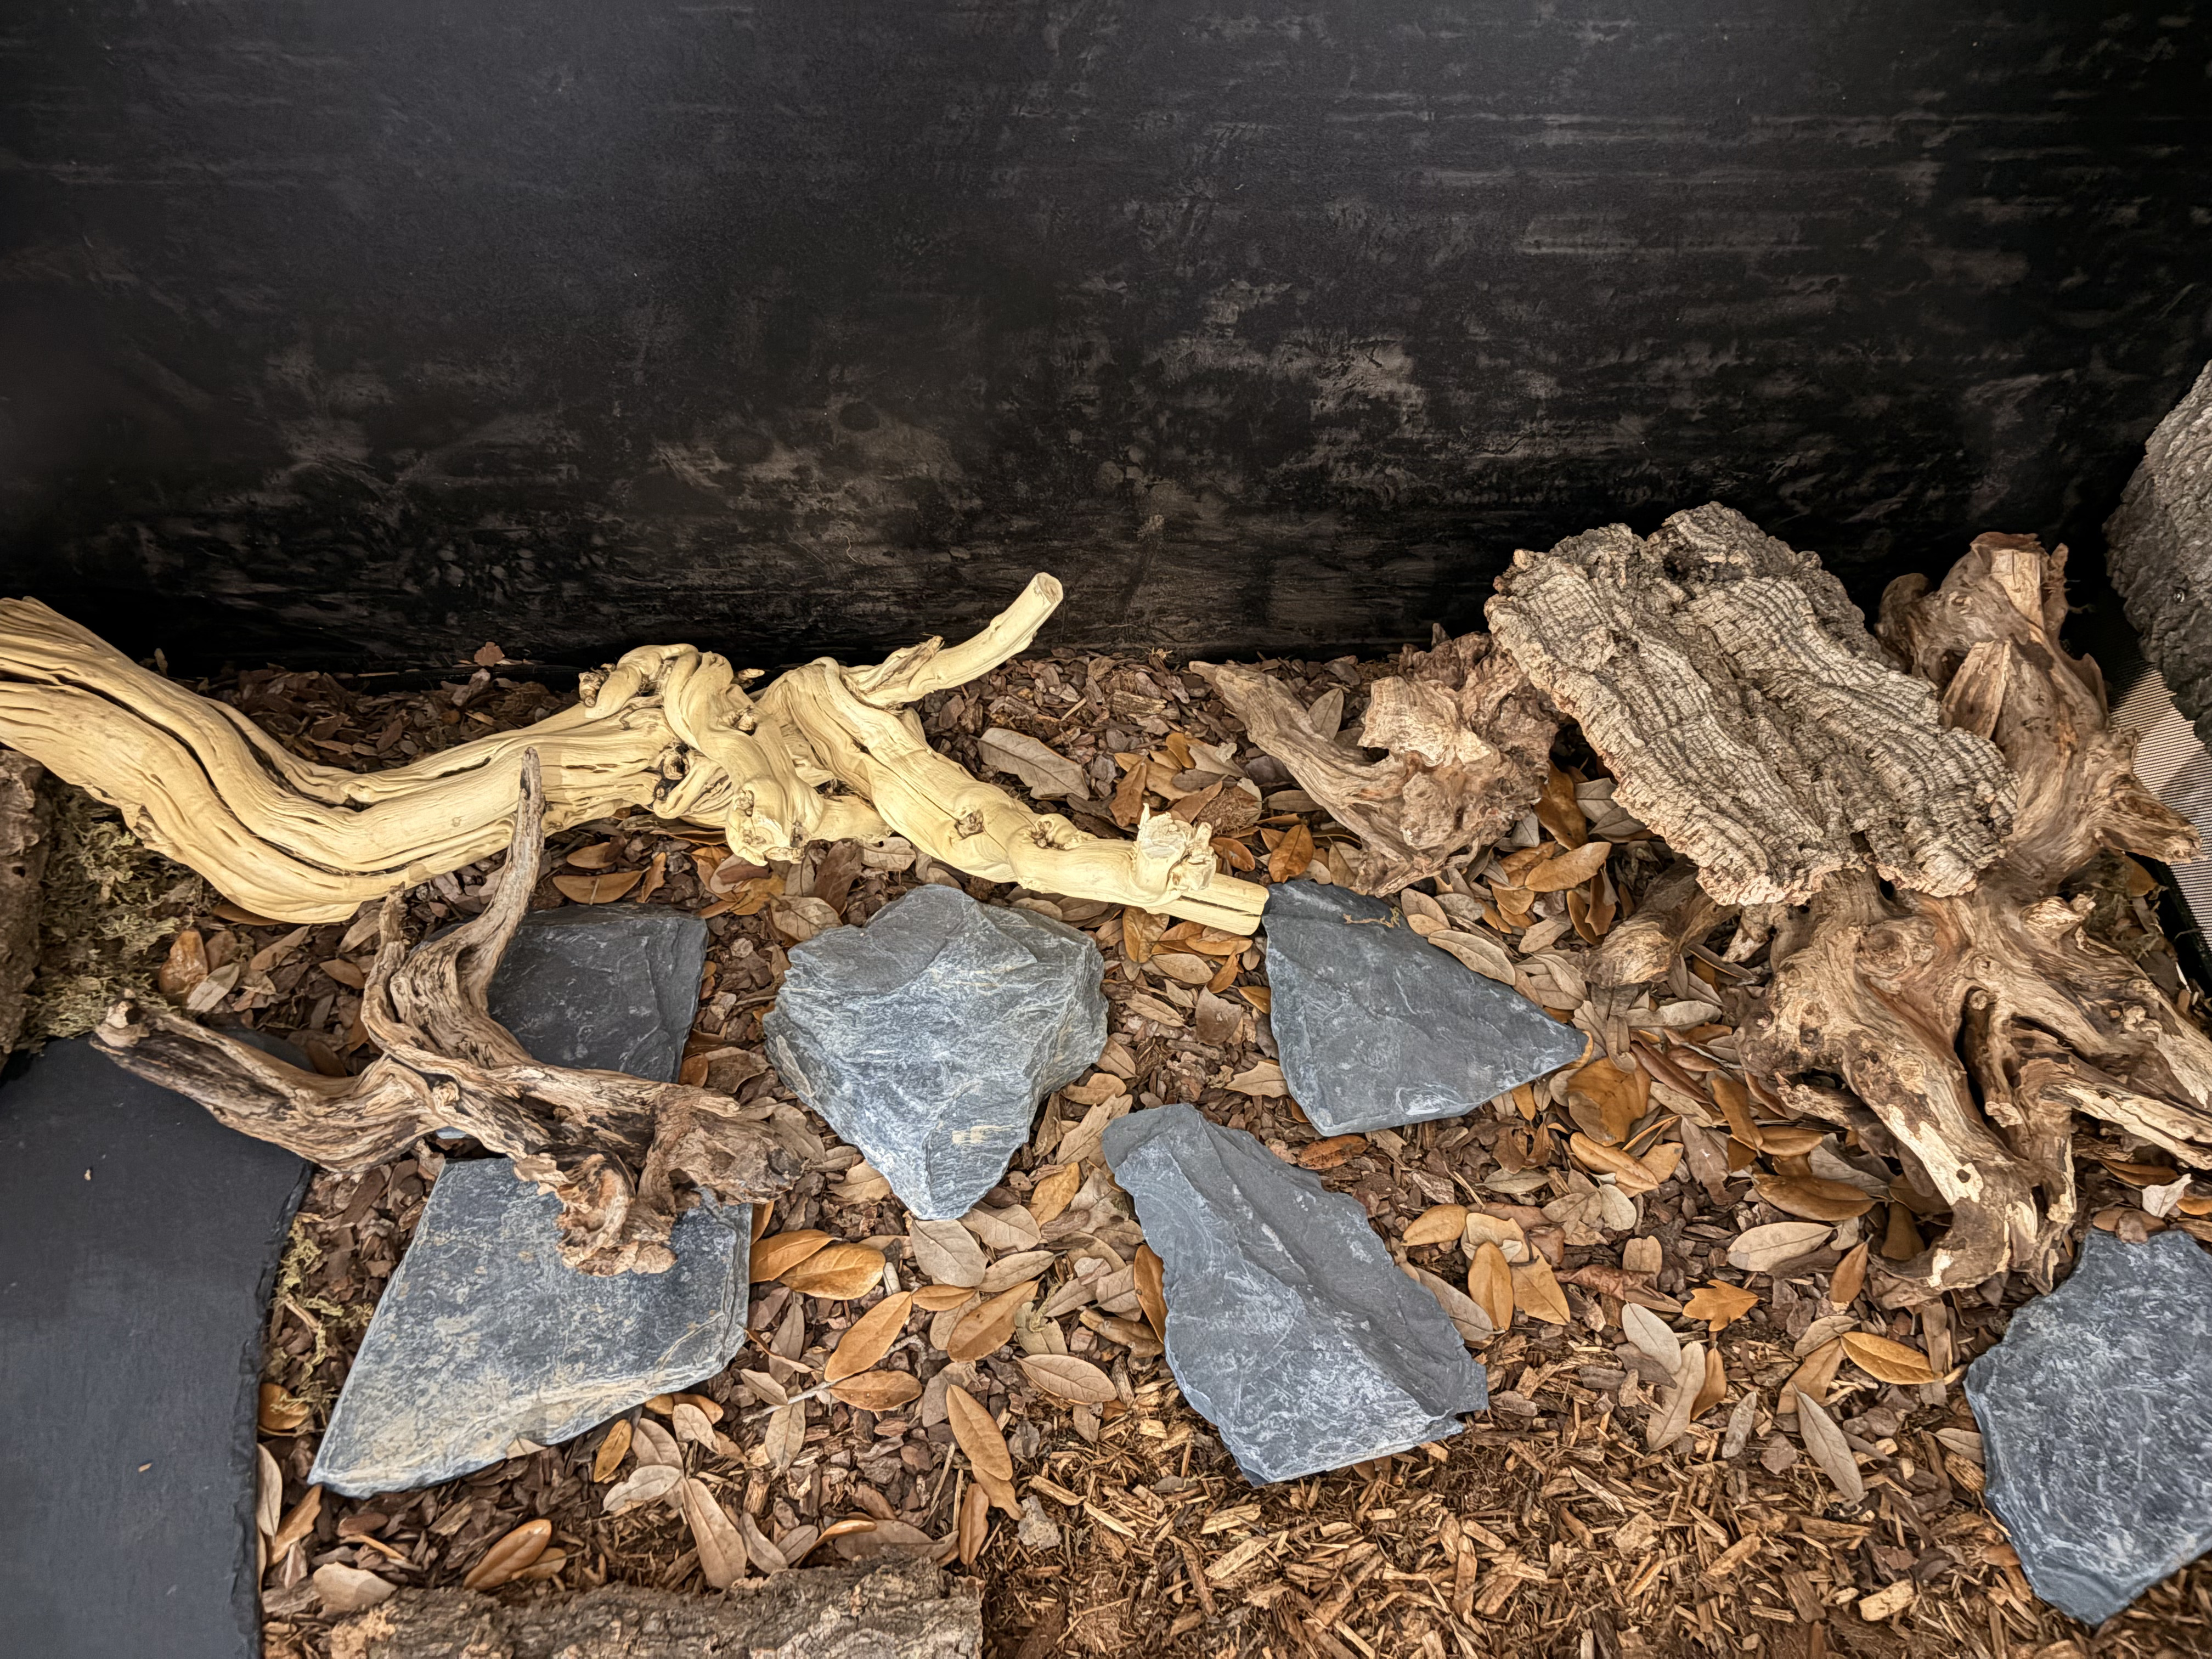
Pulled the cork hide, ghostwood branch, mopani roots and slate slabs out and rough-placed them — no substrate, no glue. This is the cheapest moment to discover that the basking mountain doesn't fit, the cave blocks the front door, or the slate path lands under the UVB shadow. Moved pieces six different ways before committing.
- Stage 3 · Hardscape locked inDay 1
Basking mountain and humid corner take shape
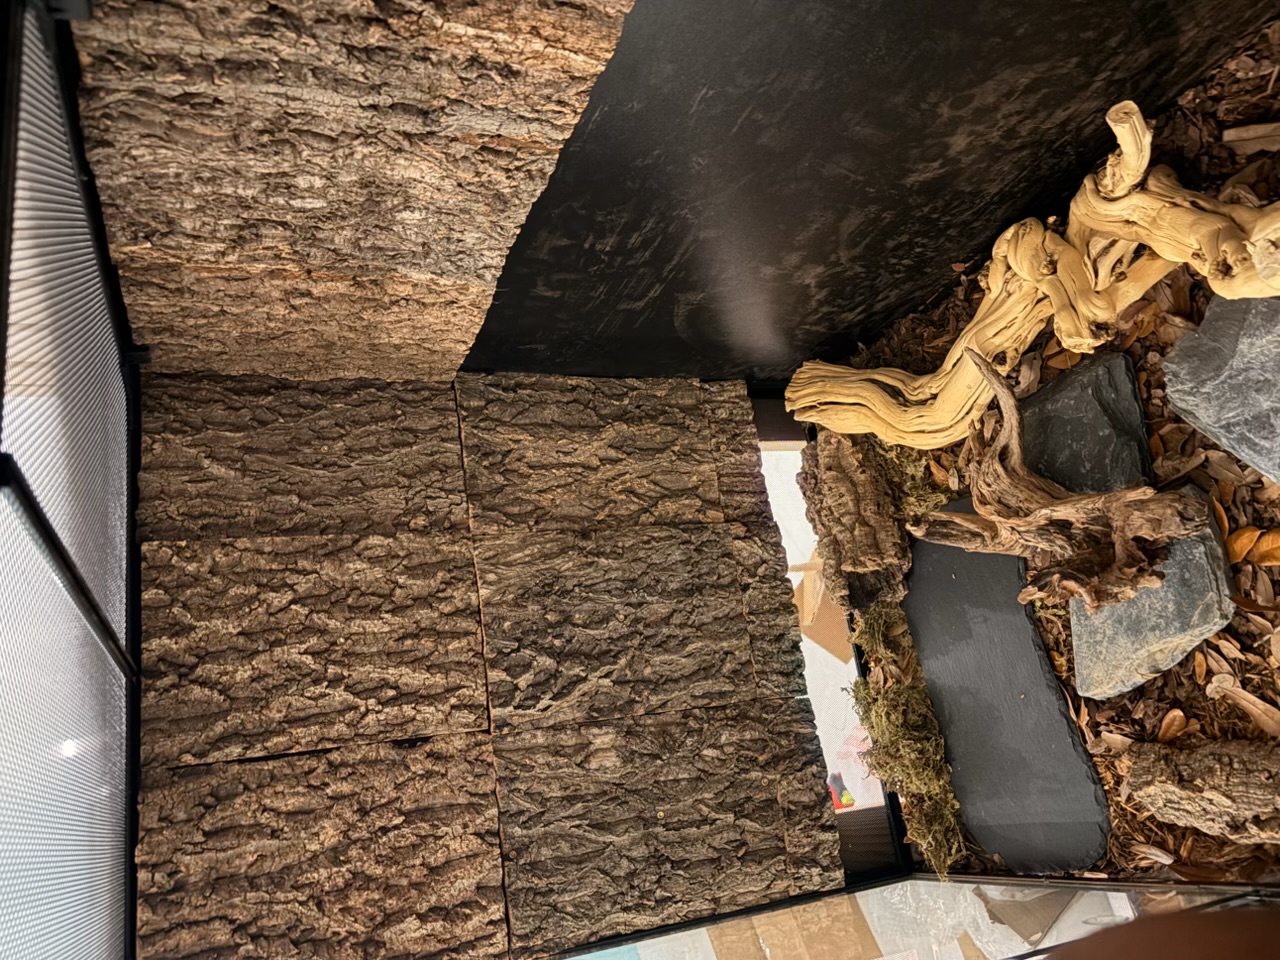
Once placement felt right, anchored the cork hide and driftwood into the corner that will sit under the basking lamp. The hollow under the cork becomes the warm hide; the slate slabs in front are stepping stones up toward the future basking shelf. Leaf litter went down so the cleanup crew has cover from day one.
- Stage 4 · Drainage layerDay 2
LECA going in — ~2" of clay-ball drainage
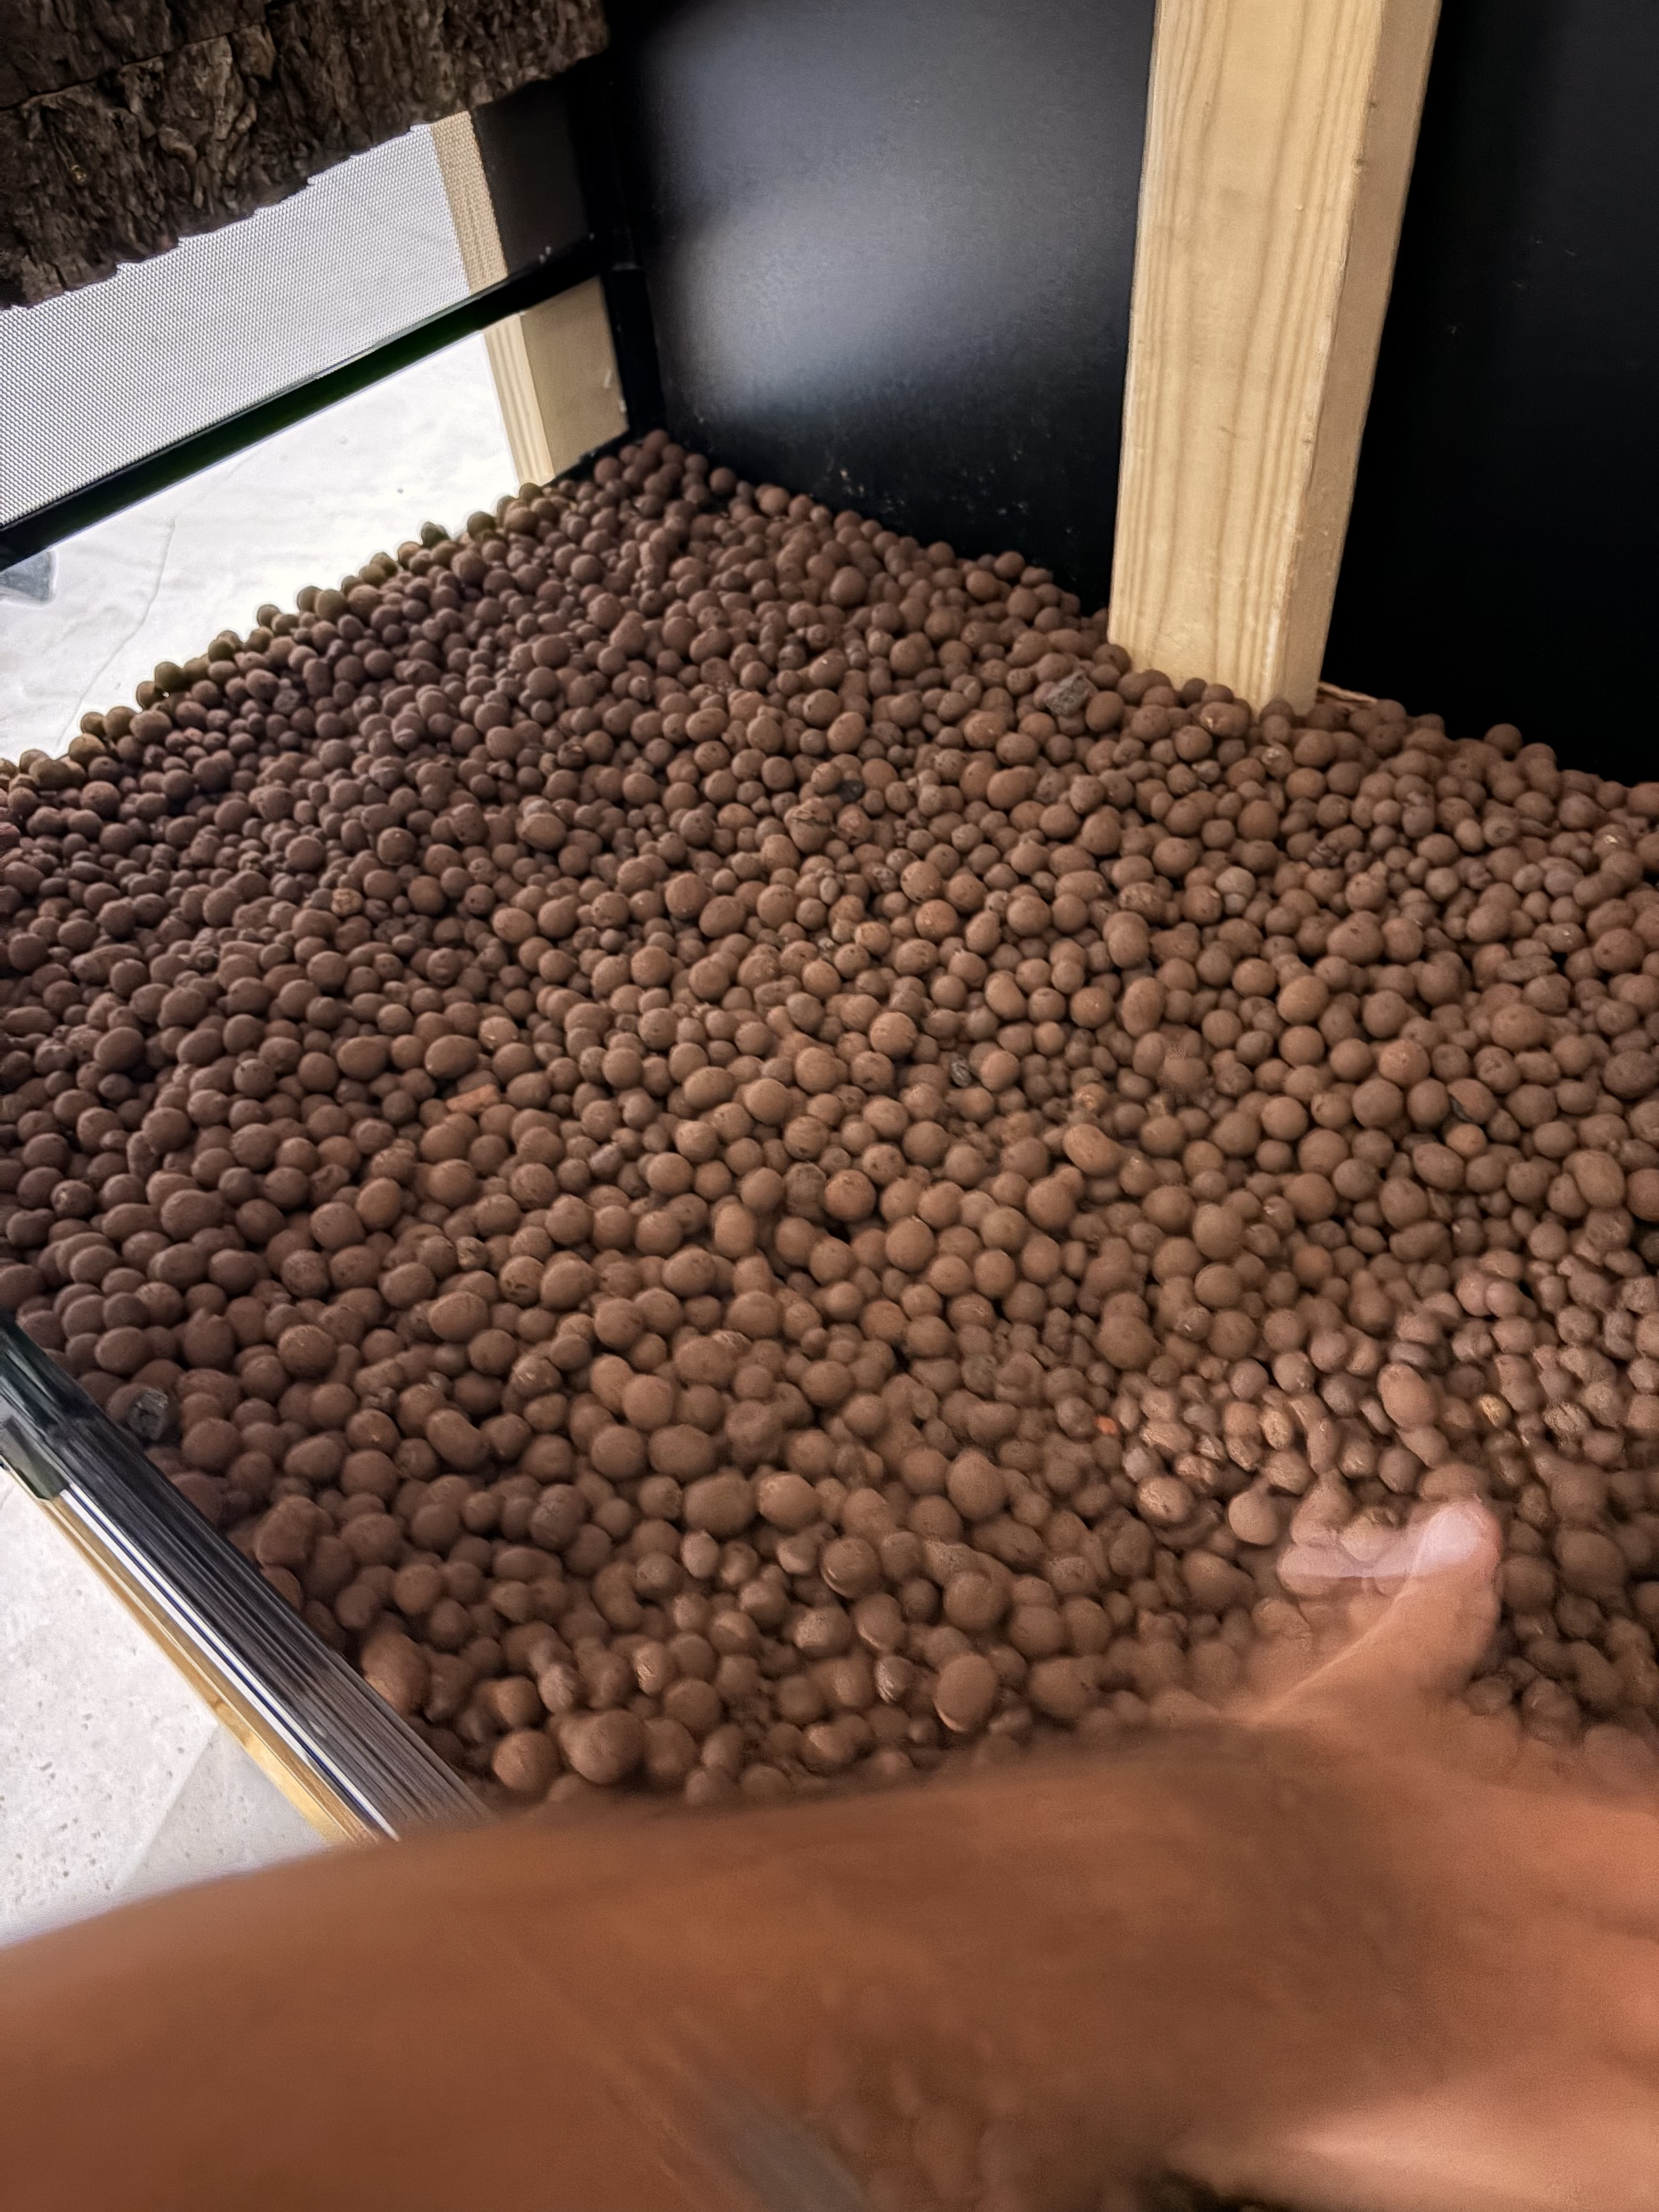
Spread roughly 2 inches of LECA across the entire floor before any soil. This is the reservoir that catches mister and rain runoff so the root zone above stays damp but not waterlogged. Fiberglass mesh layer comes next as a barrier so the substrate above can't migrate down into the clay balls.
- Stage 5 · Planted and runningDay 3
Lights on, fogger cycling, 78.6°F / 93% RH
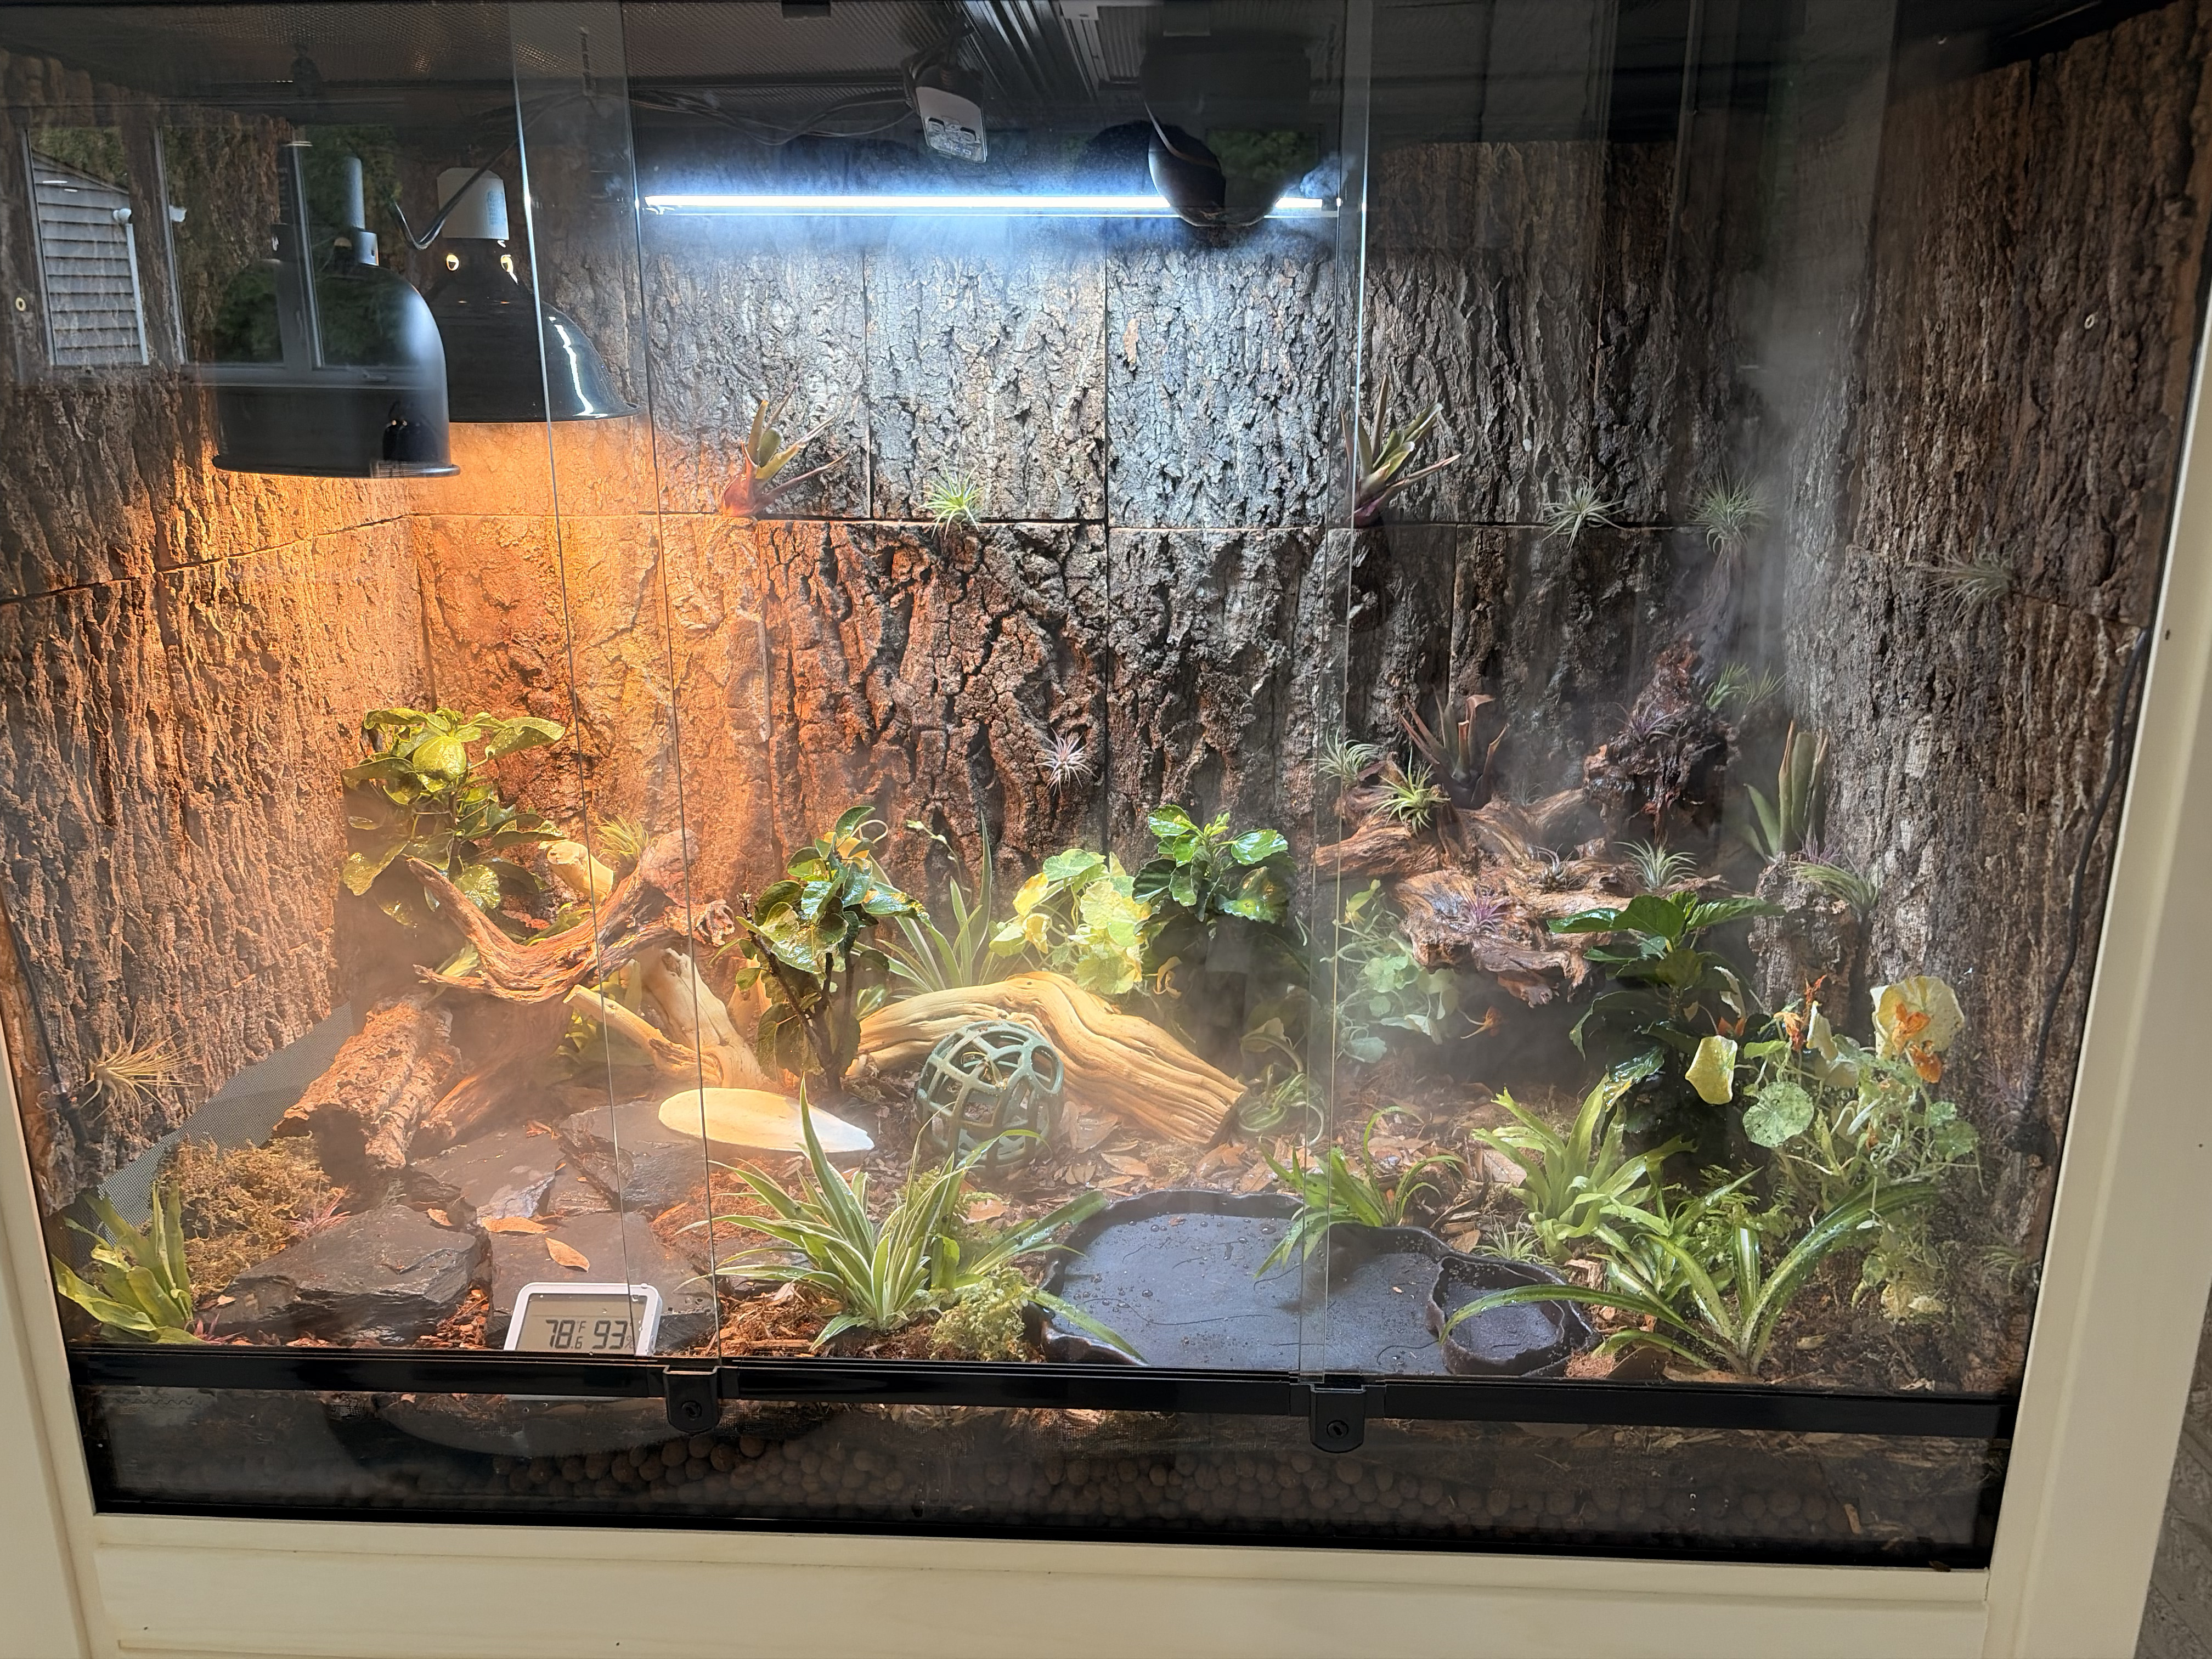
Substrate in, plants in — hibiscus, nasturtium, spider plants, air plants and bromeliads on the cork wall, ferns at the cool end. Halogen basking lamp + CHE on their thermostats, T5 HO UVB tube spanning the warm half, fogger cycling on the cool side. Govee on the floor reads 78.6°F ambient at 93% humidity right where we want it. Curing and dialing in temps now — Shelldon moves in once it's been stable for several days.